We all have seen it. Whether you look at older commits in your projects or come to a new repository, you are likely to come across commits which are named like fix issue, refactor styling, fix wrong query and have no clue what these were about, or which component or part of the application those commits have affected.
This is something you want to avoid facing when looking at a repository.
By following our guidelines and implementing the suggested setup, you can ensure consistency and clarity in your PR titles and commit messages, making it easier for reviewers and collaborators to understand the changes.
TLDR; What you can expect from reading on
- a guide to write better commit messages (and Pull Request titles)
- an example of how to implement automated linting based on commitlint
- a GitHub action that helps you to run commitlint against pull request titles to enforce proper PR titles. This is required only if you squash PRs, where the feature branch commit history gets squashed into the main branch with one single commit.
- a ready-to-go repository with commitlint and the GitHub action
You’ll find all the scripts from below in our related blog repository: github.com/satellytes/blog-jenkins-github-pr-comments
Writing good commit messages
A good commit message and PR title style are essential if you plan to maintain a project in the longer term, especially if more than one person is working on it. While it may not be crucial to have the commit messages in your branch written in the conventional style since they will be squashed anyway, it is extremely important to have the same conventional style in the pull request title.
Commit Message Styling
We are a fan of conventional commits, the de facto standard for writing sensible commit messages. Examples of proper commit messages are:
feat(api): add slack notifications to processing cron jobs
fix(dashboard): remove duplicate list api calls
refactor(metrics): support multiple query ids for stats
docs(dashboard): explain how metrics are calculated
chore(workspace): add generated files to .gitignore
output similar to command: git log –oneline | head -n 5
The most used types are feat, fix, refactor, docs, test, chore representing the intention of the commit. In the brackets, we put the scope (e.g. component or area of effect). After the colon follows the description of the change.
If you want to know more, check out the conventional commits summary. There are also options for marking breaking changes and adding additional info to a commit.
To show the last commits in the terminal, similar to the output above, type git log --oneline | head -n 10 where 10 is the amount of commits to show.
Commit Message Best Practices
Next to proper type and scope, it is all about the description (the part after the colon (:). Our recommendations:
- Clarity is Key: Craft concise, explicit commit messages. Avoid vagueness like “Fixed a bug” Offer specific details highlighting the change’s purpose or impact.
- Context Matters: Embed relevant details - issue numbers, discussions - in your commit messages. It clarifies the intent behind the changes, fostering collaboration.
- Bug Fixes & References: Addressing a Bug? Reference it in your message, briefly outlining the problem and your solution. You might also want to link the issue in the Pull Request like Fixes #123 or Resolves #123
- Logical Commits: For larger tasks or multiple fixes, break them into logical commits. Each should stand alone, simplifying review, reversion, or cherry-picking.
- Use Imperatives: Frame messages in the imperative mood - “Add,” “Fix,” “Update.” This guides the commit’s purpose, enhancing actionability.
- Summarize Succinctly: Open with a 50-90-character summary to encapsulate the commit’s core. It’s what surfaces in commit logs - make it meaningful.
- Message Updates: When revising a commit message, use Git’s
--amendoption. Avoid cluttering history with multiple messages; keep commits self-contained.
All these patterns also apply to Pull Request titles, since they will show up as merge commits if you merge your PRs using the squash merge option, which is the preferred way to not clutter the main commit history.
Enforcing correct commit style
Since we know now how to write proper commit messages, let’s implement automation mechanisms to check them on the user and repository side.
You find the full example in our GitHub repository satellytes/blog-conventional-commits-github-action so there is no need to copy and paste everything you’ll find below for trying. Feel free to clone or fork the repository, run
npm installand follow the rest of the article to understand our code better.
Install and configure the checker
We are using commitlint to validate our commit messages. It checks a string, which is handed over from a pre-commit hook, against a configured pattern defined by the file commitlint.config.js in the root of our project.
You can install the required packages with npm install --save-dev commitlint @commitlint/config-angular
We are using the config-angular style here, which is a proposal by Google. Despite its name, you do not necessarily need to work with angular, it is just the name of the team at Google which created that commitlint plugin.
An example of a valid commitlint.config.js:
module.exports = {
  extends: ['@commitlint/config-angular'],
  rules: {
    /* disable the header rule to exclude type & scope from the total length calculations
     we focus on the subject length instead */
    'header-max-length': [0, 'always'],
    /* keep the rule of max 72 for the actual commit message (without type & scope) */
    'subject-max-length': [2, 'always', 72],
    'type-enum': [
      2,
      'always',
      ['chore', 'ci', 'docs', 'feat', 'fix', 'refactor', 'revert', 'test']
    ],
    'scope-enum': [2, 'always', ['workspace', 'common', 'app', 'api', 'library']]
  }
};
commitlint.config.js
As you can see, we disable the header-max-length as well as `subject-max-length` since we usually automatically generate the scope-enum from component or library names and thus the max length would easily be reached. If you are curious where the limit 72 comes from, it’s a kind of a random number coming from an older age, but it also makes sense in terms of readability:
The limit of the line length in 70–80 characters may well have originated from various technical limitations of various equipment. The American teletypewriters could type only 72 CPL, while the British ones even less, 70 CPL. Source: Wikipedia
Like mentioned before, we tend to generate the scopes programmatically, e.g. from folder names. Take a look at the [commitlint.config.js in our example repository](https://github.com/satellytes/blog-conventional-commits-github-action/blob/main/commitlint.config.js#L13) to see how we did it.
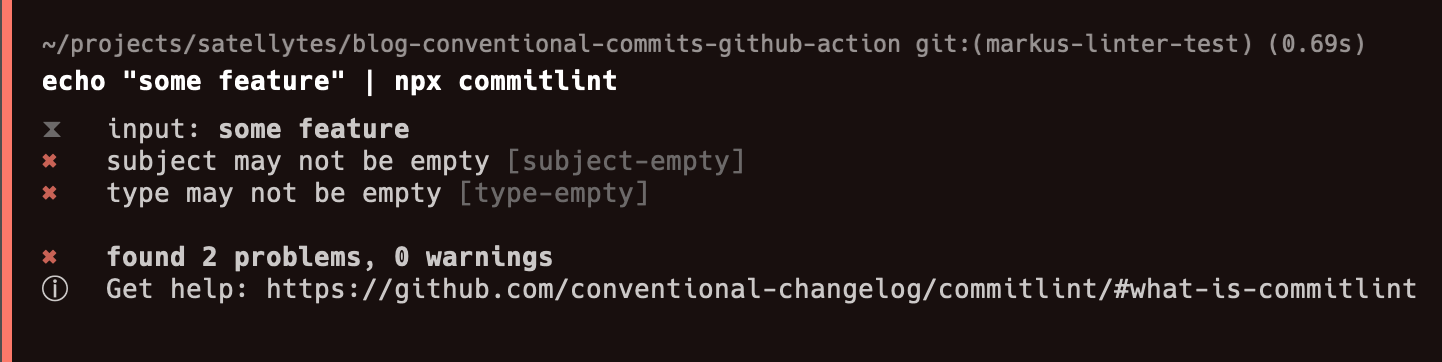
Once we have installed the packages and created our configuration, we can give it a try by manually running commitlint against a given string:
❌ Testing a wrong commit message: echo "some feature" | npx commitlint
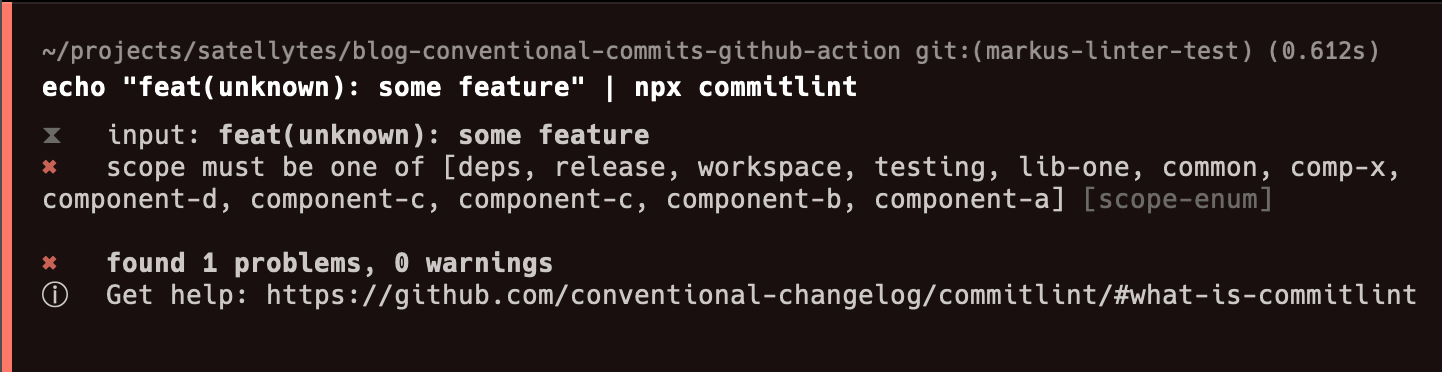
❌ A wrong type: echo "feat(unknown): some feature" | npx commitlint
✅ And a proper commit message: echo "feat(common): some feature" | npx commitlint

Upon success, the lint command remains silent.
Automatically running the check upon committing
We use husky to manage our commit-msg (and other) git hooks. It can be automatically set up in your workspace by running npx husky-init && npm install (see husky getting-started docs if you use other node package manager flavors like yarn, pnpm, bun).
Let’s add now our commitlint as a commit-msg hook: npx husky add .husky/commit-msg 'npx --no -- commitlint --edit "$1"’
You’re all set now. Upon committing, husky will run commitlint, which stops the commit from being saved if an invalid commit message is defined.
As long as no one is committing with git commit --no-verify and skips the checks, our git commit history should be in a consistent shape.
Pull Request/Merge Request title check by using a GitHub Action
This section is only relevant for repositories where “squash merge” for Pull Requests is enabled. Squashing keeps the commit history shorter, since each developed branch results in a single commit in the main branch. While a merge commit of PR results in merging all commits of a given branch to be applied on the main branch. Using squash is very common in open source and corporate projects.
Since we have now nice commits on the user side, we still can get bad commit messages into our main branch coming from Pull/Merge Requests.
My colleague Felix Hamann created a pr-title-linter GitHub action a while ago for this very reason, which can be used either directly from the codebase, or being deployed as an action in your environment.
The GitHub Action code
main.ts (source) - the entry point for our action.
It makes use of the [@actions toolkit by GitHub](https://github.com/actions/toolkit) to implement the action with NodeJS. We get the PR title from the github.context.payload, parse options with core.getIntput, run the linter with await lint(title, .., then print out the result core.info and throw an error with core.setFailed when an invalid PR title was present during the action run. Upon success, the lint shows “All good” info and the run succeeds.
import * as core from "@actions/core";
import * as github from "@actions/github";
import { lint, formatResult } from "./lint";

(async function run() {
  const title = github.context.payload.pull_request?.title;
  const configFile = core.getInput("commitlintConfigFile");

  core.info(
    `🔎 Checking if the title of this PR "${title}" meets the requirements ...`
  );

  try {
    const lintResult = await lint(title, configFile);
    if (!lintResult.valid) {
      core.setFailed(`\\n ${formatResult(lintResult)}`);
    } else {
      core.info(`✔️ All good`);
    }
  } catch (error) {
    core.setFailed(error as Error);
  }
})();
main.ts
lint.ts (source) - the lint and formatResult methods that use commitlint programmatically.
import { info, getInput } from "@actions/core";
import commitlintLoad from "@commitlint/load";
import commitlintLint from "@commitlint/lint";
import commitlintFormat from "@commitlint/format";

/**
 * @param {string} message PR title or commit message
 * @param {string} configFile path to commitlint config file
 * @returns raw results from `@commitlint/lint()`
 */
export async function lint(message: string, configFile: string): Promise<any> {
  // eslint-disable-next-line i18n-text/no-en
  info(`Loading commitlint config from "${configFile}"...`);
  const config = await commitlintLoad({}, { file: configFile });

  return commitlintLint(
    message,
    config.rules,
    config.parserPreset
      ? { parserOpts: config.parserPreset.parserOpts as any }
      : {},
  );
}

/**
 *
 * @param {Object} lintResult raw results from `@commitlint/lint()`
 * @returns string with human-readable error message
 */
export function formatResult(lintResult: any): string {
  const options: { helpUrl?: string } = {};
  const helpUrl = getInput("helpUrl", { required: false });
  if (helpUrl) {
    options.helpUrl = helpUrl;
  }

  return commitlintFormat(
    {
      results: [
        {
          warnings: lintResult.warnings,
          errors: lintResult.errors,
          input: lintResult.input,
        },
      ],
    },
    options,
  );
}
lint.ts
.github/workflows/pr-checks.yml (source) - the GitHub workflow to run the action.
This workflow is tested on github.com, so you can directly use it in your custom repository. Action runs get triggered on any PR change, including the title update.
We’re using the default ubuntu-latest runner and the public actions/setup-node@v3 to require NodeJS version 18 and install our dependencies.
We then run the main.ts script directly with ts-node to skip an extra compilation step, which you can also do locally to verify that the paths to the scripts are correct. Run npx ts-node .github/actions/pr-title-linter/src/main.ts to verify.
name: PR checks

on:
  pull_request:
    types: [opened, reopened, edited, synchronize]
    branches: [main]

concurrency:
  group: ${{ github.workflow }}-${{ github.event.number }}
  cancel-in-progress: true

jobs:
  pr-title-lint:
    name: Ensure proper PR title
    runs-on: ubuntu-latest
    steps:
      - uses: actions/checkout@v4
      - uses: actions/setup-node@v3
        with:
          node-version: '18'
      - run: npm install --frozen-lockfile
      - run: npx ts-node .github/actions/pr-title-linter/src/main.ts
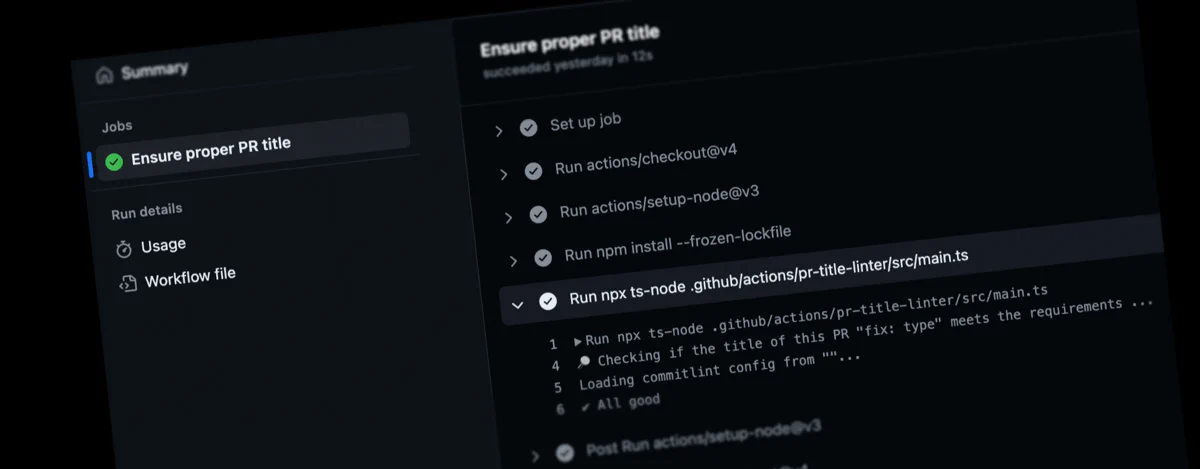
Once you have applied these code parts, or copied them over from our blog example repository, you should see that workflow being triggered when creating a Pull Request.
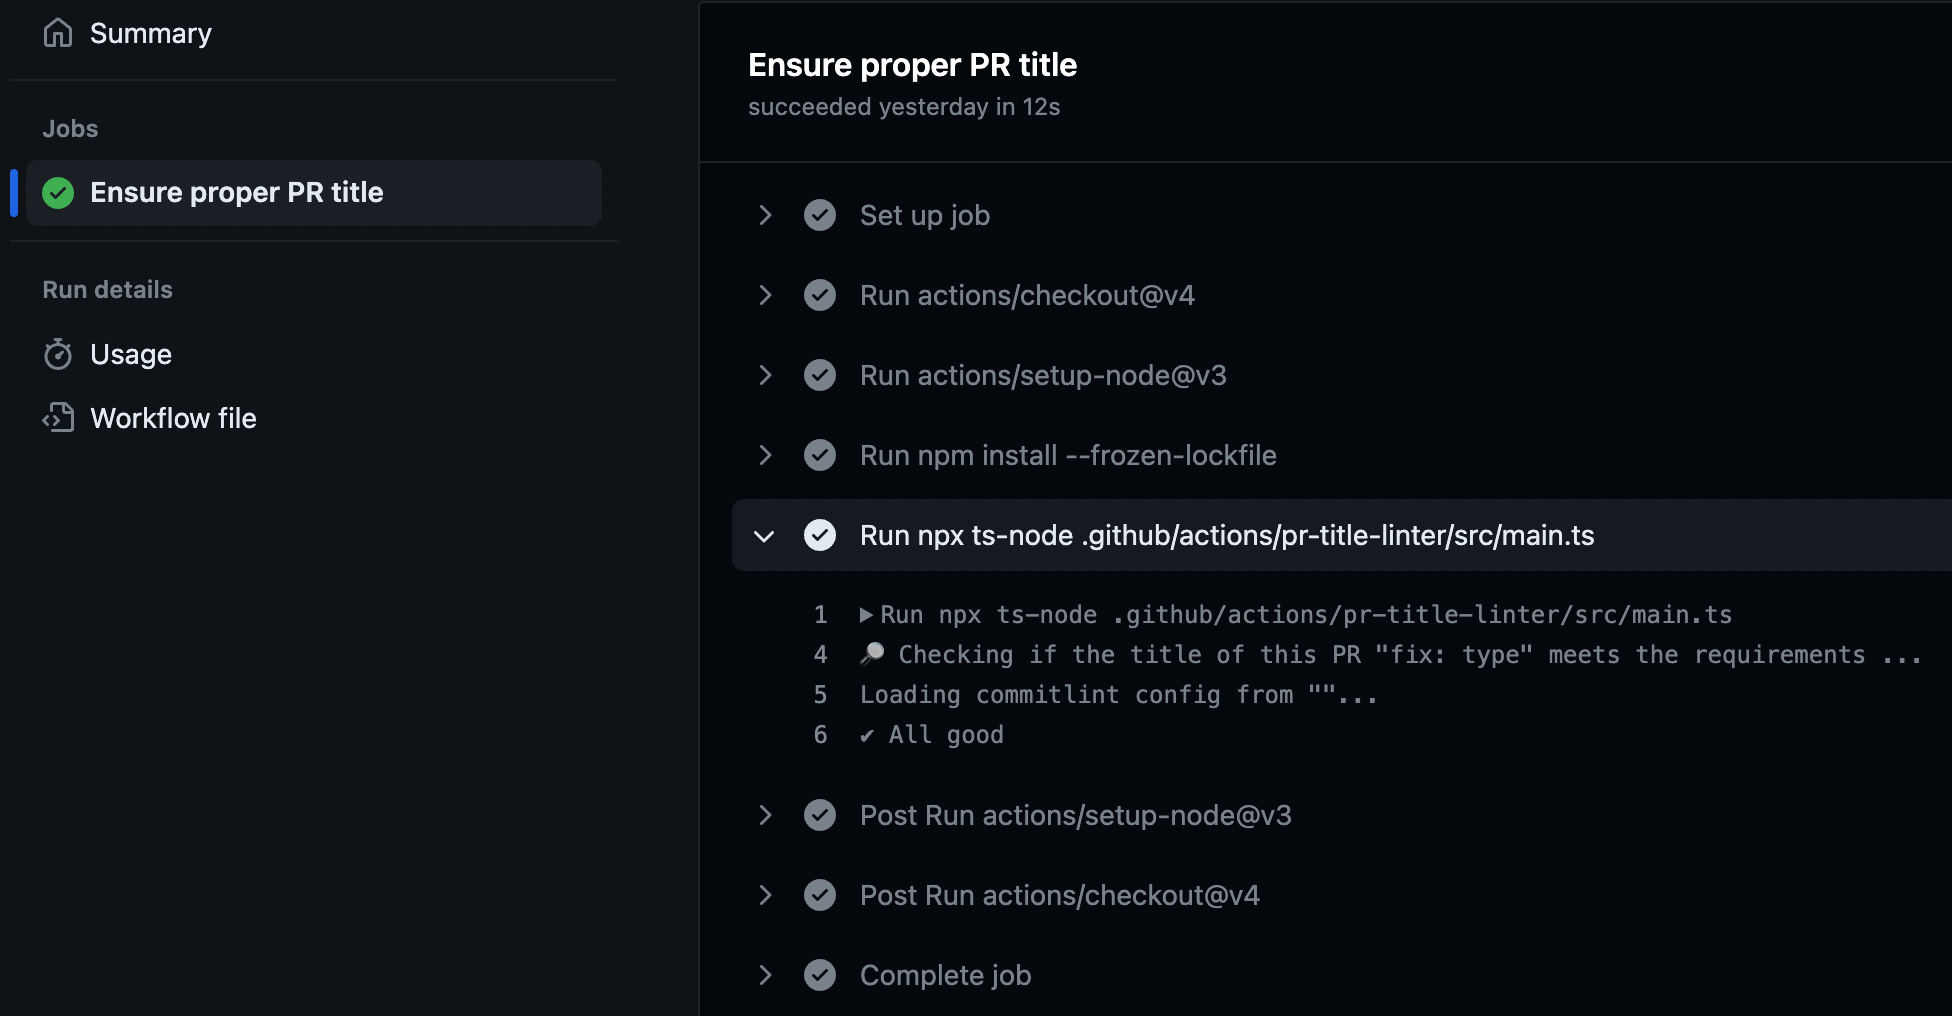
Summary
By following the guidelines and implementing the suggested setup, we have achieved the ability to write better commit messages and enforce valid Pull Request titles. This improves the clarity and consistency of our project’s history, making it easier for reviewers and collaborators to understand the changes.
Having a well-maintained commit history also allows us to leverage tools like the [release-it npm package](https://github.com/release-it/release-it) to automatically generate changelogs based on our commit messages. This streamlines the release process and ensures that our customers see relevant changes more easily.
Overall, creating a homogenous workspace with clear commit messages and PR titles is crucial for maintaining readability and simplifying the understanding of what has changed on the project in the past.